Tracklaying WithOHLE
1 Introduction
This page is intended to give an overview of techniques for placing ohle in your layout in Rail3D. See also Overview OfOHLE Systems for information on prototype ohle and ModellingOHLE For Rail3D for advice on building models of ohle components and structures.
For further details of the functions described on this page, see the User Guide.
2 Basics
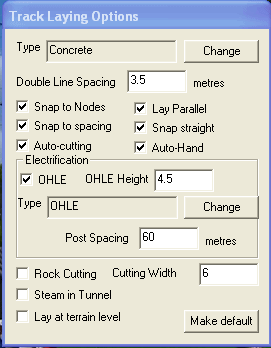
To lay new track with ohle, make sure that ohle is selected in the Tracklaying Options dialogue, choose a mast type, and set the appropriate wire-height and mast-spacing. Also make sure that “Auto-hand” is selected, so that the masts on double track will be on the correct side of the track.

The default settings work for
uk 25kV equipment, but I usually increase the mast spacing a bit
Lay a bit of track, and you should see masts and wires. The last pair of masts is on the wrong side, but this will sort itself out as soon as you lay more track.

Powered up and ready to go?
2.1 The wrong side of the tracks?
If for some reason your masts are on the wrong side, this is easy to fix. Right-click on the offending link and select “Swap track side”, and the masts will magically jump to the other side. If you are following a train you can use the shortcut key to do this.
2.2 Mast spacing
Extend the track a bit. You’ll notice that Rail3D places a mast on each node, and adds intermediate masts to get the distance between masts as near as it can to the mast-spacing you set in the Tracklaying Options. In my case I chose 60m as the mast-spacing, so if I lay a link less than 90m long I get no intermediate masts, between 90 and 150m I get one intermediate mast, between 150 and 210m I get two, and so on.
2.3 ohle on curves
When you start laying curved sections you may spot a small problem:
The wires, as you would expect, go in a straight line from one mast to the next, the track doesn’t (this example is exaggerated, of course: even on the wcml you don’t very often find 90m radius curves). The train can only draw current from the ohle if the contact wire is within the area swept out by the head of the current collector (pantograph). As a rule of thumb, the pantograph head is roughly the same width as the track gauge, so if the contact wire doesn’t fall into the space betwen the rails when you look at it from above, you need to do something about it.
The solution is to reduce the mast-spacing for the links in the curve. Double-click on the link to get the link options dialogue, and alter the mast-spacing until it looks right.
Do the same thing for the other track. Normally, the masts should still line up. If the outer track has one mast too many (because it’s a bit longer than the inner track), increase the mast spacing a bit.
You could achieve the same result by inserting intermediate nodes, but this makes it much harder to edit your layout later on.
3 Fancy Stuff
For more complicated track arrangements, the same principles discussed above still apply in most cases: lay track, look at the result, if necessary swap track sides and/or change the mast spacing.
3.1 Pointwork
Simple pointwork looks after itself:
If there is already a mast on a node, Rail3D is clever enough not to add an extra one.
For more complicated pointwork you will have to play around with mast spacing to avoid obstructions on the line:
The simplest solution here is to insert a node at the point where we want the first ast on the curved track to be placed:
This still isn’t perfect — we could do with one more support on the outer curved track, really. But we obviously can’t do that with standard masts. One answer is to use a mast with an extra long radius arm placed adjacent to the straight track; an easier option is to use gantries instead of masts.
Here I’ve set the outer straight track to the girderSpan4 ohle type, and the other tracks through the junction to GirderArm. The transition from gantry to masts on the branch looks a bit odd, but that’s mostly an artefact of the unrealistic curve radius.
When you’re laying track in station or junction areas, a good tip is to set the ohle in Tracklaying Options to a mastless type (like GirderArm) and then, when you’ve finished with tracklaying, manually change the appropriate links to a gantry type. This is much easier than doing it the other way round!
3.2 More than two tracks
When laying multiple tracks, think carefully about the layout and track spacing, and decide in advance how you are going to place the ohle. If necessary, lay a short dummy stretch first to see how it will look.
If possible, have a close look at the real thing, or at least at photos or videos.
It is fairly rare to have four equally-spaced tracks except in very confined areas; mostly the tracks will be grouped in some way, e.g. with a bit of extra space between the two middle tracks, or with the two middle tracks at standard spacing but the outer tracks a bit further apart. Newly-built four-track sections often seem to have acres of empty ballast between the tracks. Remember that railways usually prefer to avoid having to close more than the minimum number of adjacent tracks during engineering work, if it can be avoided, so space is often left for maintenance staff to get safe access to trackside equipment.
Where tracks are widely-spaced, you will probably be using simple masts. The Autohand function easily gets confused if there are more than two tracks, so you may have to do a lot of side-swapping to get them all on the correct side.
Where tracks are close together, or where there are crossovers between tracks, there will not be enough room for masts, and gantries of some kind are used. Various people have created “gantry kits” for different countries and ohle types, and you will have to experiment to see how they work in detail.
- The gantry ohle types normally provide the gantry with the ohle attachment points in place for one track. There will usually be several widths to choose from. The “home” track with the attachment points is usually one of the centre tracks, although the British-outline gantries have it on one of the outer tracks. It doesn’t greatly matter, as long as you know…
- Every kit should also contain an ohle type called Arm only or something of the sort, which provides wires and support hardware to match the gantries for the other tracks. When laying gantry track, set this as your default ohle type.
Of course, you don’t have to have as many tracks as the design width of the gantry allows — for example, a gantry designed for seven tracks might also be the right width for four tracks and two island platforms. If you can’t find the right size of gantry for your situation, you could make one, or you could lay some “abandoned trackbed” to fill up the space…
import