|
|
|
SRTM Terrain Step-by-step
Note: The method below has been superseded by new tools built into Rail3D itself — see Digitising A Railway for the easy way to do it.
I’ve been trying to use srtm data with Mark’s coordinate tool.
This is what I’ve done:
- Downloaded the srtm GeoTIFF data for the Western Isles of Scotland
- Opened the GeoTIFF in MicroDem — Note: steps 2–11 are no longer necessary: you can now open the complete GeoTiff directly in Coordinate Tool
- Selected an area of interest (Mallaig > Fort William)
- Saved this area as a seperate file (save dem>md dem)
- Closed all open files and reopened my area file
- Info tells me this has a pitch of approx 50*92 m
- Used thin with a factor of 6 and saved result as a new md dem file
- Closed files and reopened my thinned area file
- Info tells me this has a ptich of approx 350*650 m
- Saved this as ascii xyz with Lat/Long
- Closed MicroDEM
- Opened Mark H’s coordinate tool
- I have a big digitiser image for this area - but Mark’s tool cannot open it - so I produced a new version a factor of 16 smaller: this is big enough to see the area I want to select. I had to hack the dgts file for the factor of 16, but I verified it still lines up with my layout.
- Opened this smaller map in the coordinate tool
- Used the os website to identify a datum point at grid reference nn 100 750
- Used the Rail3D digitiser to idetify layout coordinates of same point: 70750,92834
- Selected os grid system
- Entered these in coordinate tool as nn 10000 75000 and 70750 92834 Mark: I expected the values to be 100,000 and 750,000 not sure why I had to use 10,000 etc to get it to work 1
- Check: If I drag on the map, I get sensible filter limits in the coordinates filter box.
- Clicked “Open dem” and selected my thinned area xyz file: if you were opening an unmodified GeoTiff in Coordinate Tool, you would have to select the desired point spacing for the output, unless you really want the complete 3 arc-sec data
- It’s a good idea to use the “preview points” option in the coordinate tool to check the conversion - this is the whole set of points and shows good correlation between the converted points and the output (but you wouldn’t want to past the whole set into R3D)
- Ran convert dem which produced a set of terrain points ready to paste into R3D :-) Note, you need to be a little bit careful to make sure that when the tool saves the new points to a text file it does not overwrite your source xyz file. I had a bit of trouble until I realised what was happening
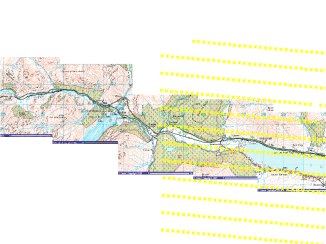
- Pasted the points into R3D and triangulated:
- I note that this method has produced a regular grid of points
this doesn’t seem to be a problem as it seems to triangulate satisfactorily.
- In fact, the regular grid works to my advantage. If I view the terrain in the R3D digitiser,
 , I can easily see where I have terrain points and I can easily select the next area I need in the coordinate tool. In fact I don’t need to worry about overlap, since if there is any overlap the pasted data will include exactly the same point and R3D will filter duplicate points out.
import
|