>.I am never sure what "stitch terrain to track" would do to adjacent terrain points not on track or
"Stitch Terrain to Track" creates a new terrain point on the track centre line, at the elevation of the track.
(You can do it from the right click menu, or by pressing the 'S' key - note that this latter only works if you turn on "Enable S-Key stitching" - this is because of the risk of creating terrain points by mistake :-) )
So, if I was using this, I would erase the point I didn't want, then use the stich to track options to create a new point on the track.
It depends on the terrain profile and what you want to achieve. On a hillside for example, the original profile (blue line) would be too high, so I would erase the terrain point (red cross) and stitch a new point at the track level, resulting in a profile like the green line.
On the other hand, if the terrain profile was generally level, but too high (or too low) as here:
erasing the point and stitching would result in a gulley or valley with the track at the bottom – which in unlikely. You would probably need to erase points over a wider area and reshape the terrain to get it to look right.
>Running the terrain setting train. Would this option change adjacent points or only those points on the track as per your last image?
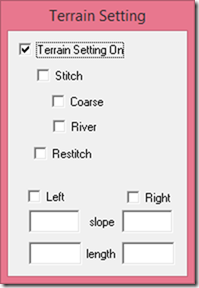
The terrain setting train tool has several modes of operation.

- Stitch creates terrain points every 50 metres along the track centre line as the train moves. Try it in view move 5 with the terrain points visible and you will see the points created.
- Stitch and Coarse creates points every 250 metres instead of 50 metres for a more varied profile.
- Stitch and River creates points to the side of the track instead of on the centreline, and slightly above the track level. This is intended for creating river beds: Lay down a river, grade it as required, then run a vehicle along the river (I usually use a Landrover, or sometimes a BMW! ) and use Stitch/River to create terrain points. This is supposed to give a reasonable river in a valley effect, with the river bed cut into the terrain surface. Note that the width of the points offset from the track is controlled by the track’s cutting width setting. Stitch/River points are about 100 metres apart.
- While the “Stitch” options create new points restitch allows the tool to adjust existing points. This is probably the most applicable to the case discussed in the tutorial. If you run a train along the line with restitch on and stitch NOT on, the tool will not create new points, but will adjust existing points to the track height. It is quite precise about how close the points are to the centre line, so a point even a few tens of centimetres off the centre line will not be picked up . It is most useful is you have stitched points along a track section, then change the track elevation, in this case the restitch tool WILL pick up and adjust the points
- Stitch AND restitch will create points and adjust existing ones.
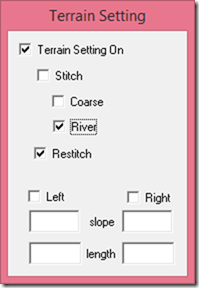
- And I’ve just noticed that Restitch and River (like this)

has the effect of erasing points on or near the track. So you could run the train along the stretch with restitch and river to erase points close to the track, then go back and use stitch (either the tool, or manual with the s key) to create new points at the right elevation on the track line.
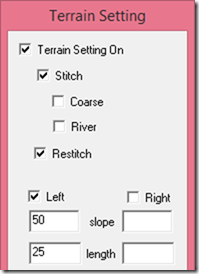
- The Left and Right options are intended for creating hill slopes to the side of the track. You can enter a slope (+ or –) and a length

when this is turned on, terrain points are created at the specified distance from the track and at the specified slope. Slope of 50 means 50%, so in the example shown, the points created will be 25 metres from the track and 12.5 metres above it. If you use a positive value on one side and a negative on the other you will get the effect of the track running along a hillside. You a slope of 0 and you will flatten the area around the track.
Hope that helps!
MRG