Creating a simple model
In this tutorial we will create a simple building
- Start the Rail3D editor
- For a new scenery item, select the Scenery tab. (We would select the stock tab for a rolling stock model (etc))
- Choose the folder for the new model and right click the folder
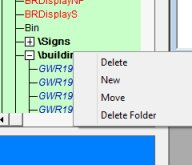
select "New" from the pop-up menu
- The "New Model" dialog opens:
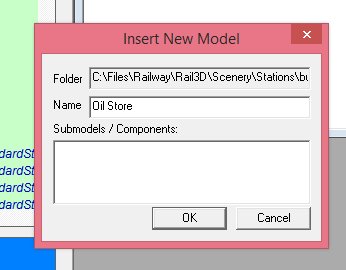
- Enter the name of the new model you want to create. You can also create sub-components at the same time if you wish.
- Note if you use this method, the editor update the index for you. You can create a model in other ways, but if you do you will need to update the index by using the rebuild index command.
- The editor creates the new model file and opens the model file in the editor:

Rail3D model units
The first thing we need to do is to specify the units the model uses. There are three main units in use:
- The default unit is 10 units to the foot (aka "decifeet"). This is the default scale used if no other units are specified.
- METRIC uses a metric scale where 1 unit = 1cm
- MILLIMETRIC is 1 unit=1mm which allows more precision and smaller detail than metric
METRIC or MILLIMETRIC is recommended for new models.

Starting the model
This model is going to be a simple shed.
Rail3D models are made up of panels with four corners (usually rectangular but not always).
We'll start by making a panel for the base of the shed.
Enter the following in the editor:
FILL -100/-100/0 100/-100/0 100/100/0 -100/100/0 50.50.50
The FILL statement defines a four corned panel, it is followed by four sets of coordinates which define the positions of the corners in width (w), length (l) and height(h).
So in the above example the first corner (-100/100/0) is at width -100, length -100, height 0. As we are using the METRIC scale, -100 is -1 metre.
So the above FILL defines a square 2 metres by 2 metres centred on the models zero point (or origin).
The final term in the FILL statement (50.50.50) defines the colour. The colour is defined as R.G.B or red. green, blue values, so 50.50.50 is a mid-grey colour.
Select "Preview" from the editor "View" menu and a preview window of the model you are editing will open:

- You can use the sliders on the side of the preview window to rotate the view, or zoom in and out.
- If the preview does not show properly, check the FILL line entered is correct, and try rebuiling the library index ( "Library" menu, "Rebuild Index")
Try editing the FILL line to see the effect of the various parameters:
- Change the colour value from 50.50.50 to some other values. The number range is 0 to 255, so a value of 255.0.0 would be bright red, 0.0.255 green etc. Black is 0.0.0 and White is 255.255.255. The preview will update as you edit the line.
- Change the coordinate values, try increasing the H term (0) of one of the corners to raise that corner. Try changing the W or L terms (100 or -100) to a bigger value to see the effect in the preview window.
Next we are going to add a side wall to the shed.
The floor was a square from -100/-100/0 to 100/-100/0 to 100/100/0 to -100/100/0. So picking one side of this square, gives us the points at -100/-100/0 and 100/-100/0.
If we want the side to be 1.5m high, we need to use these two points and repeat them 1.5 metres higher.
So enter the following into the editor (on a new line)
FILL -100/-100/0 100/-100/0 100/-100/150 -100/-100/150 50.50.50
If at first you can't see this panel in the preview, try rotating the view using the bottom slider until the panel comes into view. Again experiment with the coordiante values, and the colour term to see the effect.
Some points to note:
- The coordinates go round the panel, if you cross them over you will get a distorted panel, or the panel won't appear
- Rail3D FILL panels are normally single sided - ie only show from one side - this is why the panel does not appear until you rotate the view. You can make a panel double sided by adding "=" to the FILL line, like this:
FILL -100/-100/0 100/-100/0 100/-100/150 -100/-100/150 = 50.50.50
However you should only use "=" when you really need it. A lot of the time panels on a model are only visible from one side, so there is no point in having both sides.
- Rail3D normally displays a single sided panel so that it is visible from the outside of the model. If you want to override this, you can add "$" to the line instead of "=" like this:
FILL -100/-100/0 100/-100/0 100/-100/150 -100/-100/150 $ 50.50.50
In this case the side of the panel that displays is determined by the order of the coordinates. If this is wrong and you need to reverse the panel, highlight the panel (or panels) in the editor and use the "Reverse Panel" option in the "Translations" menu to reverse the panels. Note this has no effect on the preview if you haven't used the "$" term in the FILL line. Don't worry about this, we don't need this at the moment, just be aware that the feature is there when you come to need it.
We now have a model with a floor and one side.
We want to copy the side across to the opposite side of the building. To do this, highlight the line that defines the side and select "Reflect" from the "Translations" menu, the "Reflect" dialog appears:
Select "Reflect L" and "Leave Original"
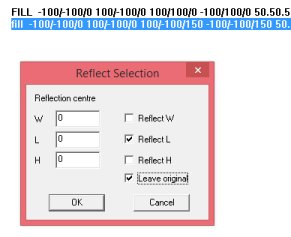
The reflect tool allows us to reflect a panel (or group of panels) about the specified point, and optionaly to make a new panel leaving the original unchanged. In this case we want to leave the original and create a new panel on the opposite side, so Reflect L / Leave Original does the job. There are also "Shift" and "Stretch" tools which do similar things.
Click "OK" and the model file should now look like this:
NAME Oil Store
METRIC
FILL -100/-100/0 100/-100/0 100/100/0 -100/100/0 50.50.50
fill -100/-100/0 100/-100/0 100/-100/150 -100/-100/150 50.50.50
fill 100/100/0 -100/100/0 -100/100/150 100/100/150 50.50.50
Again, check the preview and by rotating the view we should be able to see two opposite side.
Now we are ready to create the end wall of the building, this is going to be more complicated because we need a peak to the roof. We can start by adding a square panel the same as the first two sides on the third side of the base:
FILL -100/100/0 -100/-100/0 -100/-100/150 -100/100/150 50.50.50
FILL -100/0/200 -100/0/200 -100/-100/150 -100/100/150 50.50.50 $
The first of these panels is a square similar to before, the second is a triangle on top to give a peak. A FILL still needs four sides, but notice that the first two are the same, so we end up with a triangle. Notive I also had to add a "$" because the program couldn't workout which way to draw the panel with only three sides.
My preview looks like this:
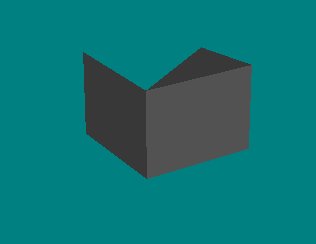
We now need to copy the end shape to the other end: select both two lines that define the end and use the reflect tool (with Reflect W and leave original) to copy the end to the other side of the building.
My building file now looks like this (I've added some comment lines which will help me later)
NAME Oil Store
METRIC
#Base
FILL -100/-100/0 100/-100/0 100/100/0 -100/100/0 50.50.50
# Sides
fill -100/-100/0 100/-100/0 100/-100/150 -100/-100/150 50.50.50
fill 100/100/0 -100/100/0 -100/100/150 100/100/150 50.50.50
#Front
FILL -100/100/0 -100/-100/0 -100/-100/150 -100/100/150 50.50.50
fill -100/0/200 -100/0/200 -100/-100/150 -100/100/150 50.50.50 $
#Back
fill 100/-100/0 100/100/0 100/100/150 100/-100/150 50.50.50
fill 100/0/200 100/0/200 100/100/150 100/-100/150 50.50.50 $
You will notice the case of FILL or fill does not matter :-)
We now need to add the roof.
Add a roof panel in the same way as the panels so far:
# Roof
FILL -110/-100/150 110/-100/150 110/0/200 -110/0/200 80.50.50
Notice I have made the roof slightly wider than the base and sides (110 instead of 100) to give a bit of overhang.
and again, I reflect the roof to the other side to make the other half.
My simple building file now looks like this:
NAME Oil Store
METRIC
Description simple oil store hut
Credit Rail3D Tutorial
#Base
FILL -100/-100/0 100/-100/0 100/100/0 -100/100/0 50.50.50
# Sides
fill -100/-100/0 100/-100/0 100/-100/150 -100/-100/150 50.50.50
fill 100/100/0 -100/100/0 -100/100/150 100/100/150 50.50.50
#Front
FILL -100/100/0 -100/-100/0 -100/-100/150 -100/100/150 50.50.50
fill -100/0/200 -100/0/200 -100/-100/150 -100/100/150 50.50.50 $
#Back
fill 100/-100/0 100/100/0 100/100/150 100/-100/150 50.50.50
fill 100/0/200 100/0/200 100/100/150 100/-100/150 50.50.50 $
# Roof
FILL -110/-100/150 110/-100/150 110/0/200 -110/0/200 80.50.50
fill 110/100/150 -110/100/150 -110/0/200 110/0/200 80.50.50
and the preview like this:
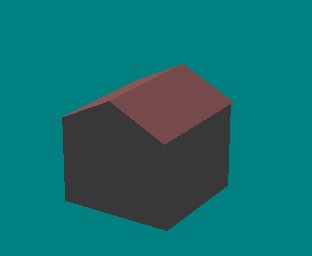
Its not a great model, but its is a simple start with the editor, and in the next tutorial we'll make it look better by Using Textures On A Model.
Tutorials
Using Textures On A Model
MRG 9/16/2014 7:03:08 PM