Derails
Introduction
On real world railways, derails are devices designed to stop low-speed runaway rollingstock from accidentally running out of a siding and onto a main line in an unauthorised movement.
Derails usually consist of a small device that, when protecting the main line, sits over one of the rails and causes any train running into it to derail, hence the name! When the points and signals are set for a train movement to or from the siding, the derail swings back down between the tracks and out of the way, allowing a train to pass without incident.
Another similar safeguard you may want to model is a Catch Points, which is usually used where the errant rollingstock’s speed is likely to be greater.
There are two ways to model derails in Rail 3D, and we’ll describe both of them here.
Derails using signals
The first way to model a derail is as a signal. Here’s how to create the model:
- Create the derail object model as a separate signal component using the Rail 3D Stock Editor. You should create it centred around W/L/H = 0/0/0, so that the rail height is at H=0.
- For each gauge of track you intend to use, define a top level signal that includes the derail object component as a signal arm statement.
- arm statements should rotate around the Z axis, just like a normal semaphore arm. However, the point of rotation will need to be somewhere such that, when rotated 90° clockwise, the derail will sit between the rails and below rail level.
- Define the state table for the arm: state S.X 0 state L.X 90
Now, to use this in your layout:
- Insert a node between the siding departure signal (if there is one) and the fouling point for the main line.
- Create a new signal on this node and select the derail “signal” you just made. Set the following options:
- Set the Direction so that the signal applies to trains leaving the siding.
- Set Samephore so that the derail doesn’t raise until the train has passed it.
- Set Lock Through so that trains don’t route to the derail.
- Clear Distant if semaphore signalling is in use elsewhere.
- When a train sets a route through the derail, the derail should clear by moving between the rails. It shouldn’t return until the train has completely passed it.
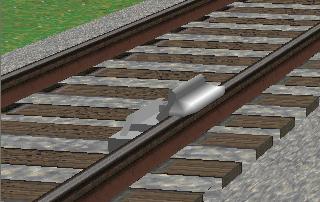
A sample derail objectNotes
- You may also wish to create the mount portion of the derail as a separate component and include it in the top level signal model as a non-moving component.
- You may want to leave Lock Through unchecked if you normally use a hidden signal here (that would not otherwise be on the prototype) to control train movements. The derail can do that for you in this case.
- You can create a second model reflected about the L-axis to get both left-hand and right-hand versions of the derail.
- The advantage with this method is that the derail can clear only when a train is routed out of the siding. The disadvantage is that a train routed into the siding won’t have the derail lifted (unless you do a workaround using scripts).
Derails using points
A second way to build derails is using points and point indicators.
- To start with, you’ll need to make a signal model of the derail object as in the above method.
- In this model, change the state table so that the arm is at 90° for a J state, and at 0° for a non-J state.
In the layout:
- Insert a node just beyond the siding departure signal (if there is one) and before the main line.
- Using an invisible track type, draw a short line from this node going off to the side somewhere. Set the default route of this switch to the invisible side, and enter * in the Other Route box.
- Clear the Draw Point checkbox so none of the pointwork gets drawn.
- Assuming your main line switch is set so the main line route is default, click on the invisible switch and then right-click on the main line switch and select Link Points.
- Now add a Point Indicator to the invisible switch, choosing the derail model you just made.
Notes
- The whole point of the invisible switch is to be able to link the derail (actually a point indicator) to the main line points, and it should be set up such that it comes off when the points are set for the main line.
- Due to the way Rail 3D works, the derail may not come off for trains entering the siding because Rail 3D doesn’t take into account trailing points with point indicators. If point indicators were more solidly linked to points sometime in the future, this may not be a problem.
Workaround using scripts
A further extension to overcome the limitations of the above two methods could be to use scripting. Because the derail may not come off using either method for trains entering the siding, you could use scripting to address the derail directly.
Under current operation, you would need to do the following to get this to work:
- Model the derail as a signal (first method above).
- In the main line signal protecting the facing points to the siding, open the script window.
- Directly address the derail signal and set its “lamp” (really an arm) manually when a junction route into the siding is set.
- Have another signal elsewhere in the siding that, when the train passes it after entering the siding, a script returns the derail signal to normal.
import