Creating a simple diesel loco
This tutorial will describe creating a simple diesel loco (the Arbed 300) using the Rail3D stock editor.
Preparation
Before starting a model build, it is essential to find as much information as possible. This should include:
- Dimensions and drawings of the subject
- Photographs.
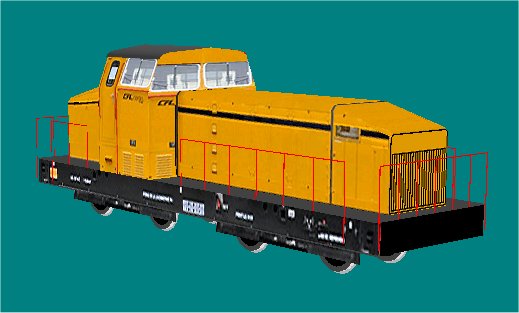
In the case of this model, information can be found on the internet: http://www.rail.lu/materiel/a300.html This pages has lots of photos showing the loco from different angles, and (at the bottom of the page) some useful dimensions.
In this case, I don't have a suitable dimensioned drawing, but I can use the dimensions given on the link and the side elevation photos to calculate the dimensions I need.
Texture Skin
The recomended way to colour models is to use a texture skin - or a bitmap that covers the whole model, we start by preparing the bitmap model.
I made this bitmap by cutting from photographs and assembling a composite bitmap, the bitmap needs to cover each side, front, back, top and bottom
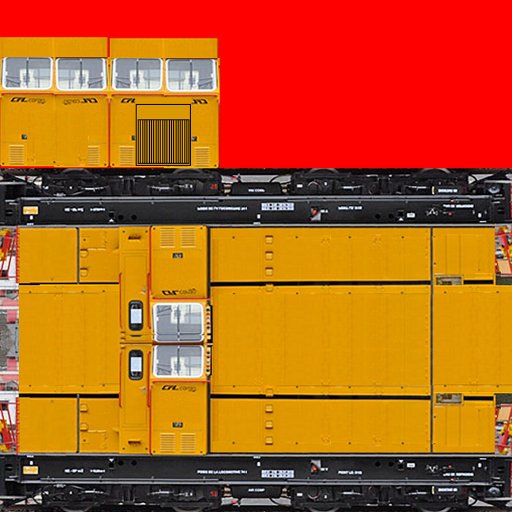
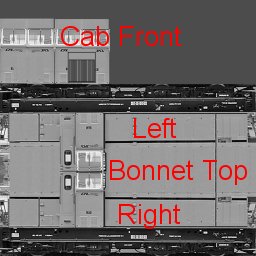
So this bitmap, has the left and right sides, the bonnet top, and the front and back of the cab:
Bitmaps should be square and a power of 2 in size (eg 512*512, 1024*1024 etc)
Note, the red area of the bitmap - this is space left for future development, eg cab interior, controls etc.
You can download the fullsize skin here: arbed300.zip
Model Heirarchy
We also need to consider the heirarchy of components in the model.
- The loco will have one main component (the body).
- The body has two bogies
Folders
Create a folder in the stock library for your new model (or select an existing folder to use).
Save the skin bitmap (above) in the folder.
Stock Editor
Open the Rail3D stock editor, right click the folder you want to put the model in, and select "New"
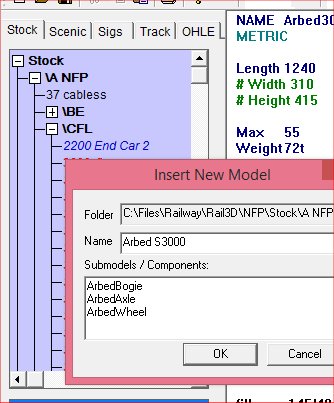
Enter the name of the model (eg) "Arbed S 3000" and any submodels/components needed. (see heirarchy)
I know I'm going to need a bogie component, an axle and a wheel component, so I enter those names in the sub-components box.
Click OK - The Editor creates the file and adds the placeholders for the components.
By default the editor uses the imperial "decifeet" units, metric is recomended for new models, so add the metric keyword to each element in the file. Add the "Component" keyword to the sub-models in the file.
We can add the model's parameters (length, weight, power etc) - these can be found on the website. Length, Weight, Power and Max (speed) are essential and must be given, other parameters can be added if known, but are not required. I've also added the height and width as a comment - Rail3D does not use these, but they are useful information while I am building the model.
The model file now looks like this:
NAME Arbed S3000
Metric
Length 1240
# Width 310
# Height 415
Max 55
Weight 72t
Power 625kW
Wheelbase 560
SKIN "Arbed300.TGA"
[end]
NAME ArbedBogie
Metric
Component
[end]
NAME ArbedAxle
Metric
Component
[end]
NAME ArbedWheel
Metric
Component
Save the file.
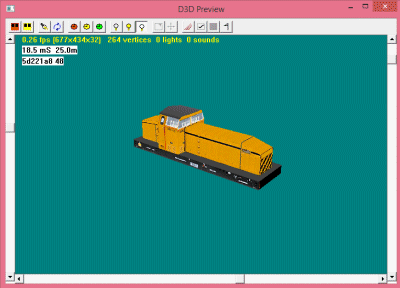
At this point, the model will actually work in Rail3D - you can put it on the track, and it will pull a train. But it will be invisible because we haven't added any panels to it yet!
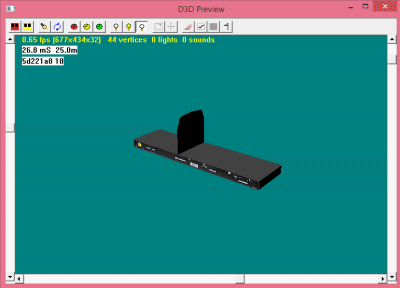
I usually start by adding a base panel - this gives me a frame of reference to work with.
Add a base panel to the model:
# Footplate
FILL 155/40/128 -155/40/128 -155/1200/128 155/1200/128 40.40.40
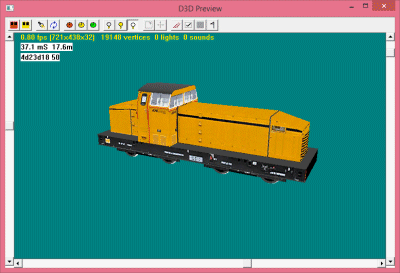
If you open the editor preview window, you will see the panel:
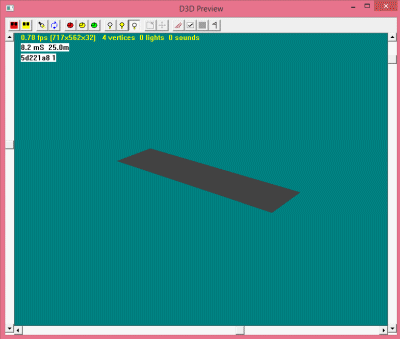
If you save the file now and put the model in a layout you will now be able to see something!
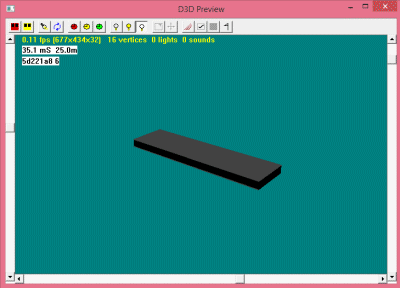
Frames
Next I'm going to give the model some structure to the frame, by adding panels below the footplate:
# Frame
FILL 145/40/128 145/40/68 145/1200/68 145/1200/128 0.0.0
fill -145/40/68 -145/40/128 -145/1200/128 -145/1200/68 0.0.0
fill -145/40/68 -145/40/128 145/40/128 145/40/68 0.0.0
fill -145/1200/128 -145/1200/68 145/1200/68 145/1200/128 0.0.0
fill 155/40/68 -155/40/68 -155/1200/68 155/1200/68 40.40.40
This give the footplate and frames a bit of depth:
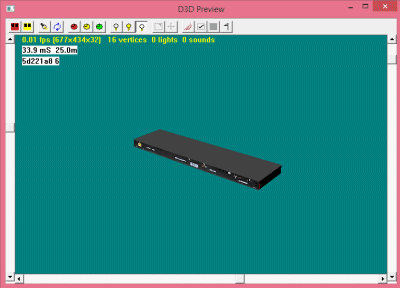
I actually want to use my texture skin on the sides of the frame, so I can specify the texture coordinates on the side panels:
FILL 145/40/128 145/40/68 145/1200/68 145/1200/128 0.0.0 @0,0.1 0,0.065 1,0.065 1,0.1
fill -145/40/68 -145/40/128 -145/1200/128 -145/1200/68 0.0.0 @0,0.1 0,0.065 1,0.065 1,0.1
Cab
Now I am going to add panels to make the cab. The front of the cab is made up of six panels to give the required shape.
# cab front
fill 155/526/128 -155/526/128 -155/526/319 155/526/319 = 220.150.0
fill 155/526/319 -155/526/319 -125/526/395 125/526/395 = 220.150.0
fill 125/526/395 -125/526/395 -120/526/400 120/526/400 = 220.150.0
fill 100/526/405 -100/526/405 -120/526/400 120/526/400 = 220.150.0
fill 100/526/405 -100/526/405 -50/526/410 50/526/410 = 220.150.0
fill 0/526/415 0/526/415 -50/526/410 50/526/410 = 220.150.0
and again, we apply a texture to the panels:
# cab front
fill 155/526/128 -155/526/128 -155/526/319 155/526/319 = 220.150.0 @0.422,0.672 0.212,0.672 0.212,0.822 0.422,0.82
fill 155/526/319 -155/526/319 -125/526/395 125/526/395 = 220.150.0 @0.422,0.82 0.212,0.82 0.23,0.904 0.406,0.904
fill 125/526/395 -125/526/395 -120/526/400 120/526/400 = 220.150.0 @0.422,0.904 0.212,0.904 0.212,0.909 0.422,0.909
fill 100/526/405 -100/526/405 -120/526/400 120/526/400 = 220.150.0 @0.422,0.917 0.212,0.917 0.212,0.912 0.422,0.912
fill 100/526/405 -100/526/405 -50/526/410 50/526/410 = 220.150.0 @0.422,0.917 0.212,0.917 0.212,0.921 0.422,0.921
fill 0/526/415 0/526/415 -50/526/410 50/526/410 = 220.150.0 @0.422,0.926 0.212,0.926 0.212,0.921 0.422,0.921

Repeat with the rear of the cab:
# Cab rear
FILL 155/330/128 -155/330/128 -155/330/319 155/330/319 = 220.150.0 @0,0.672 0.212,0.672 0.212,0.822 0,0.82
FILL 155/330/319 -155/330/319 -125/330/395 125/330/395 = 220.150.0 @0,0.82 0.212,0.82 0.19,0.904 0.016,0.904
FILL 125/330/395 -125/330/395 -120/330/400 120/330/400 = 220.150.0 @0,0.904 0.212,0.904 0.212,0.909 0,0.909
FILL 100/330/405 -100/330/405 -120/330/400 120/330/400 = 220.150.0 @0,0.917 0.212,0.917 0.212,0.912 0,0.912
FILL 100/330/405 -100/330/405 -50/330/410 50/330/410 = 220.150.0 @0,0.917 0.212,0.917 0.212,0.921 0,0.921
FILL 0/330/415 0/330/415 -50/330/410 50/330/410 = 220.150.0 @0,0.926 0.212,0.926 0.212,0.921 0,0.921
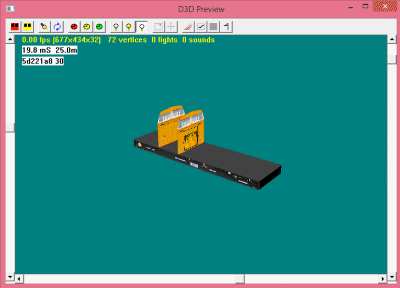
and the side panels:
# Cab Right
FILL 155/526/128 155/330/128 155/330/319 155/526/319 = 220.150.0 @0.4,0.116 0.23,0.116 0.23,0.252 0.4,0.252
FILL 125/526/395 125/330/395 155/330/319 155/526/319 = 220.150.0 @0.4,0.33 0.23,0.33 0.23,0.252 0.4,0.252
# cab left
fill -155/330/128 -155/526/128 -155/526/319 -155/330/319 = 220.150.0 @0.4,0.566 0.23,0.566 0.23,0.41 0.4,0.41
fill -125/330/395 -125/526/395 -155/526/319 -155/330/319 = 220.150.0 @0.4,0.33 0.23,0.33 0.23,0.41 0.4,0.41
I made the roof of the cab using a STRIP:
# Cab Roof
STRIP 50.50.50
128/326/390 5/0/5
128/530/390 5/0/5
125/326/395 5/0/5
125/530/395 5/0/5
120/326/400 3/0/6
120/530/400 3/0/6
100/326/405 2/0/7
100/530/405 2/0/8
50/310/410 1/0/8
50/550/410 1/0/8
0/300/415 0/0/10
0/560/415 0/0/10
-50/310/410 -1/0/8
-50/550/410 -1/0/8
-100/326/405 -2/0/7
-100/530/405 -2/0/8
-120/326/400 -3/0/6
-120/530/400 -3/0/6
-125/326/395 -5/0/5
-125/530/395 -5/0/5
-128/326/390 -5/0/5
-128/530/390 -5/0/5
ENDSTRIP
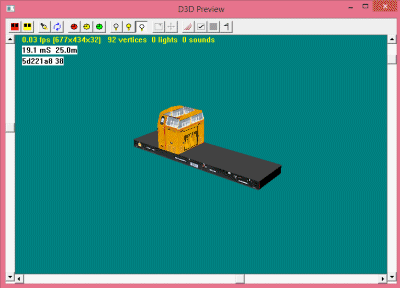
The Bonnet
The Front bonnet is built in two sections and an end piece, again using strips:
Rear Bonnet
STRIP 220.150.0
-80/330/128 -10/0/0 @0.231,0.116
-80/230/128 -10/0/0 @0.152,0.116
-80/330/309 -10/0/0 @0.231,0.246
-80/230/309 -10/0/0 @0.152,0.246
-77/330/312 -6/0/4 @0.231,0.247
-77/230/312 -6/0/4 @0.152,0.247
-73/330/317 -4/0/6 @0.231,0.248
-73/230/317 -4/0/6 @0.152,0.248
-70/330/319 0/0/10 @0.231,0.249
-70/230/319 0/0/10 @0.152,0.249
70/330/319 0/0/10 @0.231,0.420
70/230/319 0/0/10 @0.152,0.420
73/330/317 4/0/6 @0.231,0.421
73/230/317 4/0/6 @0.152,0.421
77/330/312 6/0/4 @0.231,0.422
77/230/312 6/0/4 @0.152,0.422
80/330/309 10/0/0 @0.231,0.423
80/230/309 10/0/0 @0.152,0.423
80/330/128 10/0/0 @0.231,0.556
80/230/128 10/0/0 @0.152,0.556
ENDSTRIP
STRIP 220.150.0
-80/230/128 -10/0/0 @0.152,0.116
-80/80/128 -10/0/0 @0.039,0.116
-80/230/309 -10/0/0 @0.152,0.246
-80/80/270 -10/0/0 @0.039,0.222
-77/230/312 -6/0/4 @0.152,0.247
-77/80/272 -6/0/4 @0.039,0.23
-73/230/317 -4/0/6 @0.152,0.248
-73/80/277 -4/0/6 @0.039,0.24
-70/230/319 0/0/10 @0.152,0.249
-70/80/279 0/0/10 @0.039,0.249
70/230/319 0/0/10 @0.152,0.420
70/80/279 0/0/10 @0.039,0.420
73/230/317 4/0/6 @0.152,0.421
73/80/277 4/0/6 @0.039,0.42
77/230/312 6/0/4 @0.152,0.422
77/80/272 6/0/4 @0.039,0.43
80/230/309 10/0/0 @0.152,0.423
80/80/270 10/0/0 @0.039,0.44
80/230/128 10/0/0 @0.152,0.556
80/80/128 10/0/0 @0.039,0.556
ENDSTRIP
#End of bonnet
STRIP 220.150.0
-80/80/128 0/-10/0 @0.05,0.675
80/80/128 0/-10/0 @0.168,0.675
-80/80/270 0/-10/0 @0.05,0.792
80/80/270 0/-10/0 @0.168,0.792
-77/80/272 0/-10/4 @0.05,0.794
77/80/272 0/-10/4 @0.168,0.794
-73/80/277 0/-10/6 @0.05,0.798
73/80/277 0/-10/6 @0.168,0.798
-70/80/279 0/-10/10 @0.05,0.8
70/80/279 0/-10/10 @0.168,0.8
ENDSTRIP
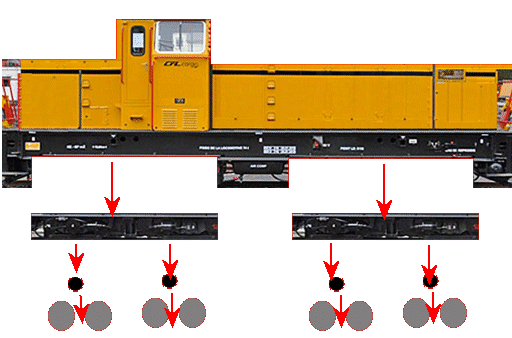
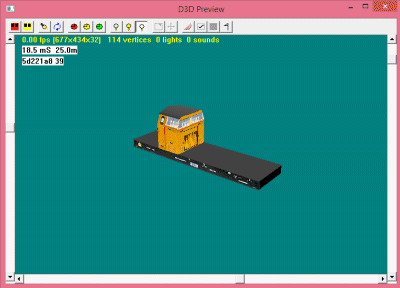
The Bogies and Wheels
The loco needs some wheels!
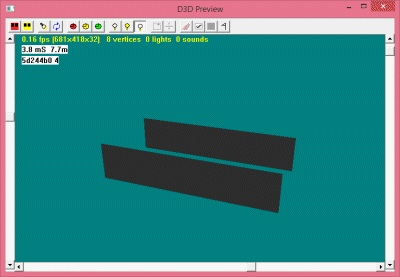
Close the editor preview, move the cursor into the ArbedBogie component and then re-open the preview. (This is necessary to get the preview to show the bogie component instead of the whole model).
The preview window will be open at this point, since we haven't created any panels for the bogie yet.
Add two panels for the sides of the bogies:
FILL 100/-210/30 100/210/30 100/210/120 100/-210/120 40.40.40 @0.08,0.01 0.43,0.01 0.43,0.05 0.08,0.05
fill -100/210/30 -100/-210/30 -100/-210/120 -100/210/120 40.40.40 @0.08,0.01 0.43,0.01 0.43,0.05 0.08,0.05
Next I am going to make a cylinder for the axle component using the cylinder tool: put the cursor in the ArbedAxle component and select the Cylinder tool from the "Tools" menu:
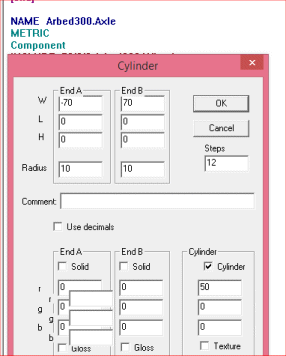
This creates a cylinder from W=-70cm to W=+70cm, radius 10cm and with 12 steps. Click OK, and the tool generates the STRIP in the axle component.
I can now go back to the Bogie component and include the axle components in the bogie:
INCLUDE 0/-125/50 ArbedAxle
INCLUDE 0/125/50 ArbedAxle
The above lines will include the axle in the bogie, but we actually want the axle (and wheels) to rotate, so we need to use the WHEEL term instead of the INCLUDE term: so change INCLUDE to WHEEL and add 50/0 (50 is the wheel radius):
WHEEL 0/-125/50 50/0 ArbedAxle
WHEEL 0/125/50 50/0 ArbedAxle

Now we go to the Wheel component and use the Wheel tool (Tools menu) to create the wheel:
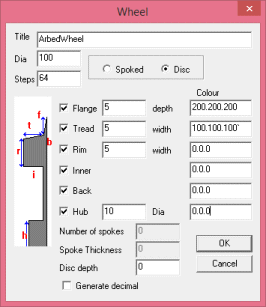
Once we have created the wheel components, we can use an INCLUDE to include the wheels on each end of the axle:
INCLUDE -70/0/0 !Arbed300.Wheel
INCLUDE 70/0/0 Arbed300.Wheel
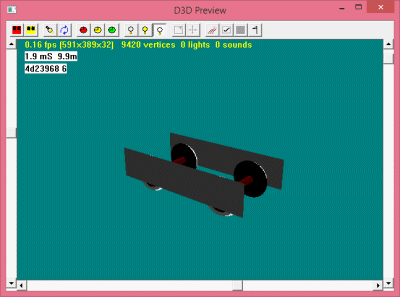
The final thing to do with the bogie (and this is essential, or it won't work properly in Rail3D) is to set the bogie wheelbase:
Wheelbase 250
The whole bogie component now looks like this:
NAME ArbedBogie
METRIC
Component
Wheelbase 250
WHEEL 0/-125/50 50/0 Arbed300.Axle
WHEEL 0/125/50 50/0 Arbed300.Axle
FILL 100/-210/30 100/210/30 100/210/120 100/-210/120 40.40.40 = @0.08,0.01 0.43,0.01 0.43,0.05 0.08,0.05
fill -100/210/30 -100/-210/30 -100/-210/120 -100/210/120 40.40.40 = @0.08,0.01 0.43,0.01 0.43,0.05 0.08,0.05
[end]
We can now go back to the main loco component and add the bogies using the BOGIE term:
BOGIE 0/340/0 ArbedBogie
BOGIE 0/900/0 ArbedBogie
Details
We can go on adding details to the model.
- Buffers (can be made using the cylinder tool)
- Drawgear.
- Brake Pipes
- Handrails etc
How far you go with detail is up to you. In my model I added handrails using lots of cylinder sections (made with the cylinder tool)
Futher work would include a cab interior and controls.
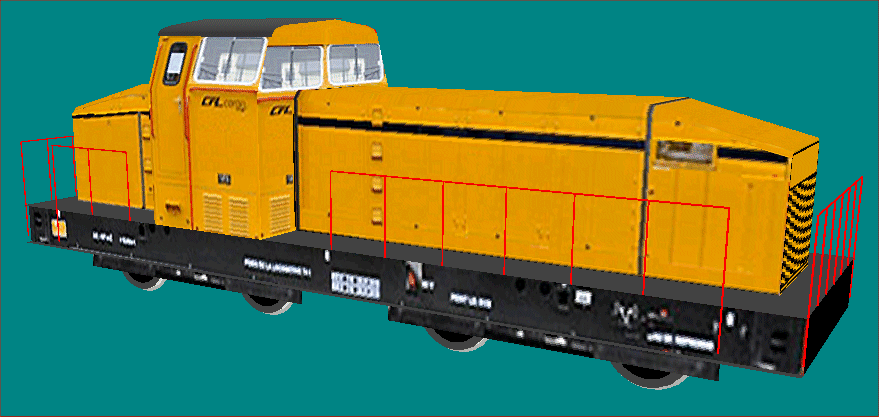
You can download the model so far (with handrails) here arbed300stk.zip Feel free to play with it and change bits around.
MRG 12/04/2015 09:16:22