Transrapid Munich Airport
1 Introduction
This model represents the proposed high-speed link to Munich airport. The 38 km line, using the German Transrapid maglev technology, would give a ten-minute journey time between Munich Airport and the city centre. At present it takes 45 minutes using the existing S-Bahn lines. If built, it had been expected to open in 2009, but it now (2008) looks as though it will never come to anything.
For more information about the real thing (insofar as there is/was a real thing…), see:
The model is based largely on plans published on those sites (the promo video is particularly useful), and topographic data from the 1:25,000 map of Bavaria (available on dvd from http://www.magicmaps.de/).
I’ve kept the model fairly simple - at 350 km/hr you need a high framerate to get any enjoyment from the model at all. It’s a great project for testing out new features like track cant.
2 The Route
- The terminus is on an elevated structure above platforms 11 and 12 of München Hbf. — as far as I can tell from the promo video, there will only be one platform.
- The line slopes down from the end of the platforn into a tunnel, the mouth of which is directly outside the European Patent Office building, shortly before the Hackerbrücke S-Bahn stop (it isn’t clear to me where the points for the start of the double track will be — it seems most likely that they will be underground)
- The tunnel makes a sharp 90-degree turn to the north to cross under the main railway alignment and the future second S-Bahn tunnel, and follows the line of the Landshuter Allee.
- At about km 1.6, it passes under U-Bahn line 1 (under the Nymphenburgerstraße)
- At km 4.0, the line emerges next to the Olympic stadium. After crossing over the inner ring road and the freight-only railway lines leading to München-Nord marshalling yard, it continues on the surface to Feldmoching (km 7.8) where there is an 1800m-long tunnel under the S-Bahn and U-Bahn stations.
- At the northern end of Feldmoching tunnel, the line is now to the west of the main München-Landshut railway (which also carries S-Bahn line S1). The tracks emerge from the tunnel just before crossing under the A99 motorway in the middle of its junction with the A92.
- From this point on, the line follows the northern side of the A92, crossing under the A9 at km 23.0
- The München-Landshut railway is crossed again at km 27.5. (The airport branch of the S1 follows the southern side of the motorway from this point on.)
- The Transrapid crosses the river Isar side-by-side with motorway and S-Bahn at km 30.8
- At km 32, it crosses over the motorway and the airport link road to run on the surface between the link road and the S1.
- The proposed maintenance depot is situated on the airport perimeter, just beyond the junction of S1 and S8, next to the existing fuel sidings. The access tracks join the main line at km 34.0 (an elevated structure is used for the depot access tracks to cross the S-Bahn line)
- At km 35.5 the Transrapid enters the final tunnel under the airport terminal building side-by-side with the S-Bahn.
- The airport station is at km 36.7, adjacent to the existing underground S-Bahn station. It looks as though there are to be two platforms with a reversing siding beyond.
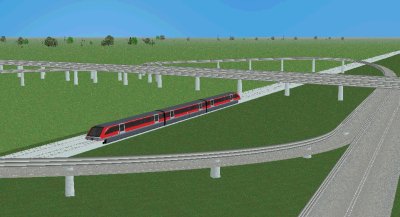
3 Vehicle and Guideway
There are a number of drawings on www.transrapid.com that give the approximate cross-section of car and guideway, so the guideway itself was fairly easy.
In the absence of any detailed drawings, I’ve used my imagination a bit for the car itself, and tried to come up with something that doesn’t blatantly contradict the various publicity drawings on the web. The overall size is correct, although the weight is a general value not specific to the Munich cars. te and power are pure guesswork — because the motor of the Transrapid is in the guideway rather than the car it isn’t straightforward to quote a power value per car. With the current set of guess values, the distance to accelerate to 300km/hr seems to be approximately correct, so I’m evidently not too far out.
todo: I intend to experiment with scripts to see if I can model the dynamics a bit better. As the traction and braking system is essentially an asynchronous motor, it should be reasonably straightforward to apply the script I devloped for the Gornergrat cars. Note that cars and track have the “rack” keyword, because the traction and braking are not adhesion-limited (except in the event of a power failure, when the car coasts on battery power to the next emergency stop area and then crash-lands on skids).
The real Transrapid is centrally-controlled, and has no visible signals, of course. (It’s not entirely clear to me whether there will be a “driver” sitting in the front cab of the trains.)
The Rail3D signals are thus invisible, and are scripted to produce a rudimentary braking curve. I’m still tinkering with this, but the aim is that the signals will be used to enforce the speed limits in the tunnel sections.
Because the area of the line is essentially a flat plain, shelving gently down from a height of about 520m in the city to 450m at the airport, I tried the experiment of using a program to generate a mesh of terrain points rather than adding points myself by hand according to the map (See Random Terrain Mesh)
After refreshing my memory of the area with a trip on the S1, I realise that the low wooded hills north of the line are more conspicuous than I had thought — they will need to be added by hand from the map.
6 Download
The layout package can be dowloaded from
Rail3d Layouts#ntoc11
(nb: requires Rail3D 2kd build 94)
Mark Hodson June 23, 2005, at 07:19 pm
import