Making Rail3D Models With Google Sketchup
Note: This is partly a tutorial, but also an account of my ‘journey’ in devising a sensible way to make models with sketchup - the method isn’t complete yet, and this page will be updated as I progress
1 Google Sketchup
Google Sketchup is a free 3D modelling program, while it lacks many sophisticated features of better 3D modelling programs, it is feasible to use it to make Rail3D models.
Google Sketchup can be downloaded free from http://sketchup.google.com/download.html
2 Pre-requisites
Before attempting a Rail3D model, you need the following:
- A copy of Google Sketchup.
- To have worked through the sketchup tutorials - don’t skimp this - the video tutorials don’t take that long and there are lots of useful tips and techniques that you will miss otherwise. Particularly you need to know about guide lines, entering precise numeric values and texture handling and positioning.
- The Rail3D export plugin for Sketchup. This is currently under development, but if you are familiar with Google Sketchup, and have a model you would like to try the beta plugin with, please email mark@rail3d.net
3 Preparation and planning
Before starting the model we need to do some preparation. Ideally we will have a full set of scale drawings, but often we have less information to go on. At very least we need to know width, length and height.
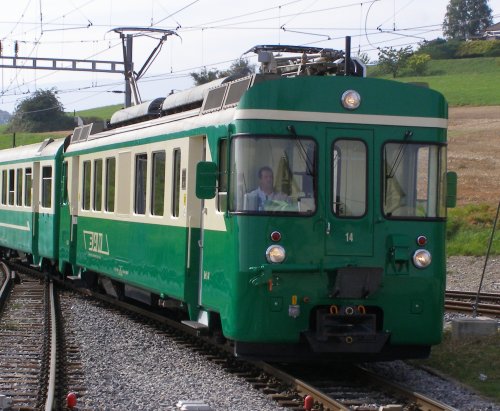
Photo, copyright mrg, September 06In my case, I making a model of this railcar:
I don’t have drawings, but I do have enough good quality photographs to be able to measure the principle dimensions.
3.1 Prepare the skin
The next step is prepare the texture skin. Rail3D runs most efficiently when a single texture skin is used by a model, so ideally we want all the textures required combined into a single bitmap file. It’s also worth noting that for most efficient rendering the bitmap should be square, and have dimensions that are a power of 2, eg 1024*1024
So, before we start we need to give some thought to the texture areas we are going to need - once we start it’s difficult to add more to the texture - in fact we will need to remap all the textures again so we need to give some thought to this before we start. It’s always worth adding some spare texture space for the things we forget as well so we can add these later. We don’t need to produce fully detailed textures at this point, but we need to mark out the area we are going to use.
I’ve marked out my texture skin as follows:
So, I’ve allocated areas:
- Left and right sides (lower left), I need two sides since there is lettering which can’t be reversed
- Front - used for both ends, I allocated quite a large area for this as it will quite prominent in the model
- Bulkhead (marked red) will be used for internal bulkheads and dividers
- Seating (blue) will be used for internal seats and fittings
- Door (light blue) for the doors
- Control desk and fittings (yellow)
- Bogie frames (purple)
- Internal walls (cream, lower right)
- Underframe (grey)
- Roof fittings, grills etc (grey)
- Spare - magenta top and right
note they won’t be these colours in the final model, this is just to distinguish the areas at this stage. of course if you can provide the complete texture at this stage, so much the better.
4 Modelling in Sketchup
Now we’re finally ready to start modelling in sketchup.
The first thing to do is to use the guidelines feature to mark out the principle dimensions of our model:
Next I’ve added a simple floor as a point of reference:
4.1 The side
To make the side, we need to use Sketchup’s push/pull tool to cut out the shape we want. Also, by the way, it’s a good idea to assign different components to different layers so we can hide different elements and just work with the ones we need at any time.
So, to make the side, I’ve drawn a vertical rectangle, and then used the push/pull tool to give it a thickness of 5cm:
Next, I use the rectangle tool and the curve tool to mark out the shape of the lower edge, and use the push/pull tool to punch out the area I don’t want:
Now I can import my texture:
and use the texture positioning pins:
to get the right bit of the texture over my side:
To be honest, this is a pretty fiddly and tedious process to get the texture positioned precisely. I’m wondering if it might be possible to code another sketchup plugin to make the process easier.
I do the same on the other side (the inside) but position the texture to show the inside.
note that I don’t need to import the texture again, I can just paint it from the materials pallete once it has been imported once
4.2 Doors and windows.
Getting the texture on and correctly positioned is a pain, but once it’s on, cutting out the doors and windows is easy, and makes all that effort worthwhile.
For the doors, I simple mark a rectangle on the side:
(I have drawn it larger here so it can be seen)
and use the push/pull tool to punch it out:
At this point I’m using the texture as a guide and simply draw my cut-out rectangles over the marked areas on the texture.
The windows are a little bit more complicated, as it appears the sketchup won’t let you punch out an area in this way unless it is on an edge. Fortunatly, this is easily overcome if I draw a line along my face at the top of the windows:
This divides the face and now sketchup will let me draw a rectangle from the line:
and punch it out as before:
and so on:
Note that the dividing line won’t show in the final model since the texture is continuous across the line. or if I want to I can now delete the line segments
I could have used texture transparancy to cut out the doors and windows, but this method is fairly easy to do and will give a nice 3D depth to the window. Later I can put a strip of glass in as well to fill the windows.
4.3 The ends
The ends are a bit of a challenge since they include several curved surfaces - indeed this is my main motivation to use Sketchup as modelling these curved surfaces with the text editor is pretty difficult.
First of all I’m placing a rectangle and then marking out some curves to give the shape of the outer and inner walls of the curved front ends.
I delete the bits I don’t want, just leaving the thickness of the end walls.
Which is drawn out to height with the push/pull tool
The top piece is quite a complex shape, so I’m going to start with a solid block, and remove bits to get the shape I want.
First I mark out the same curves as the front bit I’ve just made,
then remove the corners to give the basic curved shape
Next I use the move tool on the outside corner point to bring it in and give a slope to the outer edge. I do this on both outside corners
Ideally I would have liked to move the front edge back as well but sketchup wouldn’t let me. Maybe I should have tried the scaling tool on the top surface…
The next step is to shape the back of the top section, I’m going to use the intersect surface tool to do this as it can create quite complex intersections.
This one is fairly simple, I just need a sloping obejct to intersect with my top element and I apply the “Intersect with surface” command to this sloping block.
Then delete the block, and I’m left with a sloping back face on the top piece:
I do the bottom piece the same way - create a solid block, mark out the corner curves and remove the corner pieces.
But this time, I’ve used the scaling tool on the bottom face to move the bottom front edge back in:
Now, I’m going to need two of these - one at each end, so I’ve made it a component for ease of manipulation and I can apply another instance of the component to the other end of the vehicle
Texturing.
Using the texture positioning commands the same way as the sides, I’ve applied the texture to the front face and positioned it.
nb, before I did this I added some guidlines to the texture bitmap to aid with judging the overlap required.
Finally we need to extend the texture onto the other surfaces of the end component.
It took me a while to work out how to do this and get a seamless skin: the trick is to set the texture to “projected”.
Having applied the texture to the main panel - as above
- Right click the textured panel and tick “Projected” on the “texture” sub-menu
- Open the material selector (click the paint pot), but instead of selecting an existing material, click the dropper tool on the selector and then click the above textured panel to paint with this texture
- Click on the other panels and the texture should be wrapped over these panels as in the picture
5 Export and conversion
The model so far in sketchup:
Run the Sketchup Rail3D export plugin to produce a stk file, open the stk file in the Rail3D editor and add Rail3D info such as power, weight, speed, etc. I also added the pantograph components (a seperate model) in the Rail3D editor.
The result in Rail3D:
import