Rail3dH0
This project is both a bit of fun and a nostalgic hommage to a certain style of railway modelling: the good old German tradition of buying all the track you can afford and fitting it into the smallest possible space. I used to do this with Trix Express (3-rail, coarse scale ho). The great thing about Rail3D is that you know that the whole project isn’t going to collapse because you need one more right-hand point than you have in the box. I wanted to see how hard it would be to reproduce one of those temptingly-complicated layout diagrams you see in the manufacturers’ catalogues.
1 87:1?
In Rail3D objects are normally treated as being the same size they are in the real world — we work in a scale of 1:1. To “meta-model” ho scale, we could continue to work in 1:1, using the new millimetric keyword to build very small models. However, it’s a lot easier to scale everything up by 87:1 (the reciprocal of ho scale), so that we can continue to use existing stock and scenery models. All I had to do was make a suitable track model to give that authentic coarse-scale look.
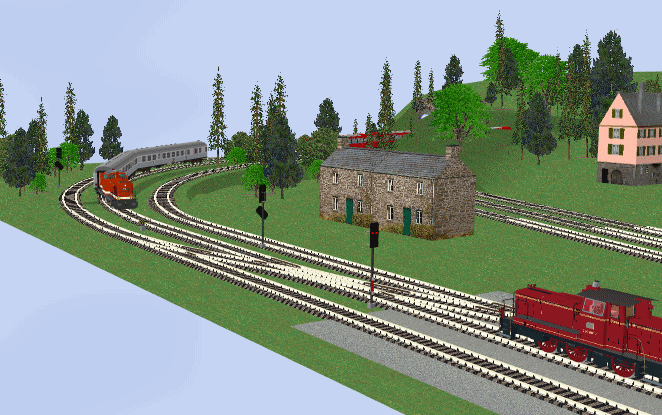
As you can see, I decided to model Märklin’s classic “M-Gleis” metal-based track — much more recognisable than Trix (Trix was bought by mã¤rklin some years ago — they still produce a limited number of models for 3-rail dc). I resisted the temptation to model the contact studs in 3d — the texture, taken from a photo, is fairly convincing anyway. It’s a pity that the characteristic wedge-shaped base gets hidden under the terrain…
2 The Layout
Because it was so popular, there are many examples of layout diagrams based on the M-Gleis track geometry to copy. I found this example on Michy’s Modellbahnseiten, but I could just as well have scanned a page from the old mã¤rklin trackplans book I bought from a fleamarket for no very good reason, ca. 1975.
3 Ways of laying fixed geometry track in Rail3D
To get the right look, you need to have the appropriate radius for the curves and switches, of course. Broadly-speaking, there are three ways to simulate fixed-geometry track in Rail3D:
- Tracing a diagram in the Digitiser
- Using generic scripts (cf. Using Scripts For Tracklaying)
- Importing from an external layout design tool
4 Tracing in the Digitiser
My first attempts with Rail3D 87:1 were made before the Rail3D scripting language was extended to allow tracklaying operations to be scripted, so I just used the Digitiser.
4.1 Straights
I set the track type to my new mã¤rklin model, and used the digitiser to lay one track of each straight section. I tried to make it as authentic as possible by putting in a node for each rail-join on the plan — with hindsight, this is probably more trouble than it’s worth. Put in nodes where you will need them for points or to align with parallel track, otherwise you will only need them where there is a transition from straight to curve.
To get it accurate, you need to zoom in as far as you can in the digitiser. I have found that you get better results if you lay one extra “dummy” node with the digitiser at each end of your section of track. Set markers on the first and last “real” nodes, do Straighten Between Markers, and then delete the dummies. Something to watch out for if you have very short links, as in this case, is flipped nodes. If the rails cross (!) then unflip the node using the Smooth Node function.
I didn’t bother too much about height at this point: I set the bridge to 8m and everything else to zero.
Measuring on the plan, I found that the track spacing is about 80mm. Checking the M-Gleis documentation, this should be 77.4mm — a whopping 6.733m in 87:1. Putting this into the track settings, I next laid the parallel tracks. This needs a bit of care when tracks are packed into such a tight space, especially round the back where there are two pairs of tracks that will run at different heights. Keep saving and backing-up. It helps a bit if you turn off “snap to track spacing”when you don’t need it. It might also be useful to reduce the track spacing setting — nodes seem more inclined to flip if they’re closer together than the track spacing parameter.
4.2 Curves
Laying the curves should be a simple matter of joining-up the straights. However, the difference between Bezier curves and circular arcs is quite noticeable for these small radii. In the end I found the best technique for the 90 degree bends was to use the digitiser to lay a short piece of track with nodes at the 30-degree rail-joins, then link these to the straights, and smooth the two intermediate nodes (not the straight-to-curve transition nodes!).
4.3 Grading
At this stage, with the second track in place, the main line should be complete, and we can grade it. Lock the nodes at the beginning and end of the two ramps, and use Grade Between Markers to set the intermediate points. Because the main line is a continuous loop, you can almost guarantee that the “wrong” side of the loop will be graded: temporarily delete one link in a flat area of each track to force the grader to go the way you intend. For the rear section of the layout, grade each track separately, otherwise the lower pair of tracks will be set to the height of the ramp.
Autocutting should be switched off for the bridge and tunnel sections, on for everything else, as usual. Cutting width needs a bit of care — I set it to 7.5m everywhere except fot the inner two tracks on the four-track section, where I used 6.5.
4.4 Pointwork
Putting in the pointwork is straightforward, provided that the relevant nodes are all in the right places. The only real problem is that there are a couple of three-way points in the layout (after all, they want you to buy expensive bits, don’t they?). I added a second node close to the first to simulate these.
M-Gleis point motors were concealed in the base of the track, so there’s no real need to model them separately. I added point lanterns. I set the points up to give a direct run around the main line in either direction in their default state. The trailing crossover at the east end of the station was set to put trains back on the correct track, and the loop points for the station were set to Free Route.
I used my own discretion here. In keeping with the spirit of the layout, there should be a lot of stop signals but not very many distants. I used German mechanical signals everywhere except under the bridge. The signal posts are too tall to fit here, and rather than build a new short version just for this location I used colour-light signals. I added a mechanical shunt signal and a reverse to each siding, so that they could be controlled from a panel. With a couple of intermediate signals on the main line (a model railway is one place where an automatic semaphore is reasonably authentic), it should be possible to run two trains in each direction.
4.6 Operation
The layout works fairly successfully with the panel. However, as soon as you start to run trains, you see the limitations of the 87:1 format. The station loops are only long enough for three coaches, and shunting possibilities are rather limited, in spite of the large numbers of sidings. It is quite fun to run it like a screensaver — just set four trains going and watch them from a great height.
Tip: Follow a train in roughly the area you want to look at. Pause the simulation. In view mode 2, zoom out a long way and pan around until you can see all, or most of the layout. Select
Stop Following, and continue the simulation. Only drawback is that you lose this view as soon as you move the camera.
4.7 Cheating
So, of course, I built v2.0, which has a set of Hidden Sidings (Schattenbahnhof) under the hill. This way it’s much more fun to watch. You can add lots of trains, and really kill the framerate. Hmm — maybe the trick would be to put the hidden sidings a few hundred metres away, so that Rail3D isn’t wasting time trying to draw the inactive trains.
5 Alternative approach: scripts
I built this layout before the Rail3D scripting language was extended to allow tracklaying operations to be scripted: using scripting would be a more accurate way to build fixed geometry track. cf. Using Scripts For Tracklaying.
In this case you could use my universal arc script to build the curved track. You simply have to modify the radius of the model track by the scale factor (87 for H0, 160 for N) to get the right radius. If you are building a lot, it might be worth making a custom set of scripts hard-coded with the standard radii and angles for the track family you’re using. You could also build a script for the standard straight track lengths, but it’s just as easy most of the time to lay straights with the mouse, reading the length off the tracklaying tools.
5.1 What about Rail3D 160:1?
Well, of course, if you can do it for H0, it should be possible to do it for N as well — I did a little test and found that I could simulate the Fleischmann N-gauge track system without too much difficulty.
Part of a simple 2mx 1m N-gauge layout using Fleischmann track geometry imported from
XtrkCadOf course, N-gauge is all about fitting a lot into a small space…
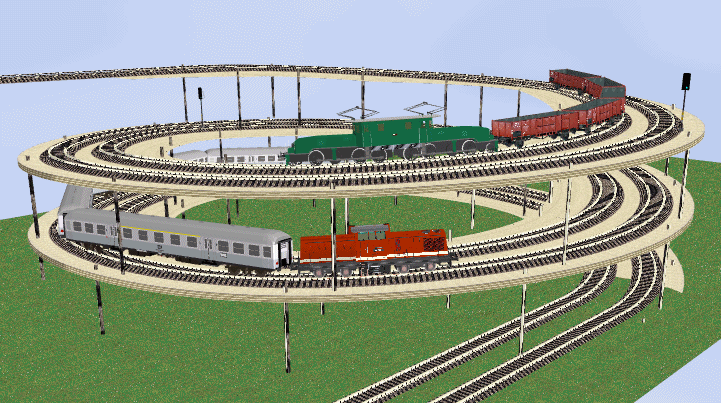
Rail3D discovers the double helix!
The helical ramp (Gleiswendel) is made to the dimensions of standard N-gauge modelling parts from Noch and Fleischmann. It’s the sort of thing that is concealed between the tunnel mouths on all the best “rabbit warren” layouts, and it’s something you can only do in Rail3D using scripts. The trick is to use an odd angle for the curved track segments (e.g. 61 degrees), so that the nodes on successive turns don’t coincide in their x,y coordinates. I also found that it’s nearly impossible to add linear scenery by hand (it always ends up on the wrong turn), so I used an additional track model incorporating the plywood base and legs.
6 Importing from an external design tool — Rail3dXTraktor
If you really insist on modelling model railways in Rail3D, you might like to know that I’ve built a little tool that can glean useful information from layout files created with the popular (open-source) layout design program XTrkCad.
- Download Rail3dXTraktor from Rail3d Utilities
Note: I’m working on an improved version of the xtraktor, which produces a tracklaying script as output. Should be ready for release fairly soon, I hope (mh, Feb 2009)
7 Summary: Ways to lay fixed-geometry track in Rail3D
7.1 Tracing from the Digitiser
- Quick and dirty
- Not very accurate
- requires an existing diagram (so no scope for tinkering with the layout)
7.2 Using generic scripts
- Accurate (if you know the track geometry)
- Takes a bit longer
7.3 Import from xtrkCAD
- Accurate
- Quick to create the diagram
- Sometimes needs a lot of tidying up after import
- Batch process — not easy to add to or modify an existing layout
8 Conclusion
As I knew from the beginning, this is a futile exercise — Rail3D is designed to simulate real railways, and that’s what it’s exceptionally good at. Simulating models is just a way of adding extra constraints you don’t need (e.g. the size of your hobby-room), and which don’t add much to the Rail3D experience.
Using manufacturer’s layout diagrams is a challenge, but doesn’t necessarily give you an interesting layout to operate. The primary object of publishing such diagrams is to sell track and models — in most cases it’s going to be much more interesting either following your own fantasy, or getting your layout ideas from the real world.
Purpose-built layout design tools (like xtrkCAD) are much better for playing around with sectional track than Rail3D. Where Rail3D could be useful is in testing the operational possibilities of a layout before you start building. How many coaches will fit into this platform? Where should I place signals? Is it better to have a facing or a trailing crossover here? How long does it take a train to do one circuit? How many trains will I be able to operate at once?
If you get really nostalgic playing with this — someone has uploaded a bunch of old Märklin TV spots to Youtube.
MRG 05/06/2013 11:11:22